
We may earn revenue from the products available on this page and participate in affiliate programs. Learn More ›
This content has been brought to you by Quikrete. Its facts and opinions are those of BobVila.com.
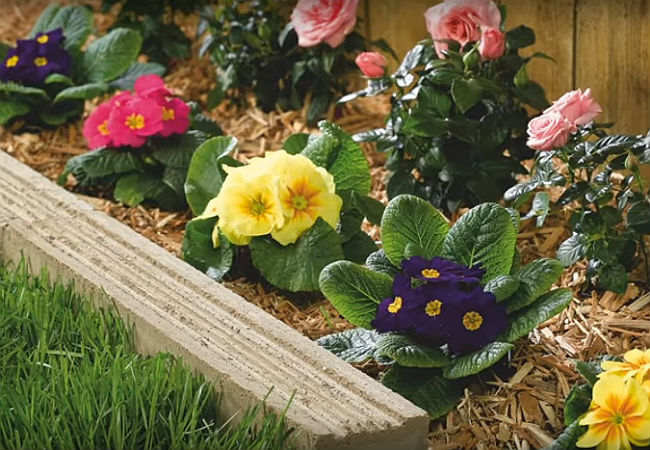
Lawn and garden edging elevates your landscape much like how a frame does a photo: The dramatic emphasis around the perimeter focuses attention on what’s within the borders. While you’ll find a variety of edging materials at your local home improvement center, virtually nothing offers as much creative flexibility and as sharp of appearance as poured concrete. It can be molded into curves or corners for a distinct separation between lawns and rock gardens or flowerbeds—by do-it-yourselfers of any skill level! Then there’s there’s durability to consider: Not only is concrete one of the strongest materials around, it’s virtually maintenance-free. Best of all, concrete is affordable (approximately $2 per linear foot for poured concrete edging). By all accounts, it’s a no-brainer means to boost your curb appeal.
Use your next spare weekend to complete a concrete project that draws more attention to your well-manicured lawn and maintained flower beds. Go ahead and preview the project in this instructive video from the pros to get an idea of how it’s done. Then, with a little help from Quikrete, we’ll walk you through the four main parts of the process.


Step 1: Planning and Preparation
Lay out where you want to pour your new edging. Be creative! A meandering concrete border with graceful curves will help define the best aspects of your landscape; use a long garden hose to guide this shape. If you prefer a straight border, swap the garden hose for stakes and a string line.
Decide what size you’d like to make your edging.
You can go as wide as you like, but the strongest concrete edging is at least 3½ inches wide and deep. Additionally, at least two inches of that depth should be below the surface of the soil; this below-grade portion holds the border securely in place. The tops of your concrete edging can either be flush with the surface of the ground or rise a couple of inches above ground level, depending on your desired look.
Dig a trench along your guide.
Your trench should be one inch deeper and two to three inches wider than the size of your concrete edging. When digging, try to keep the sides of the trench as vertical as possible. Scrape the bottom of the trench even with a flat-head shovel to remove any rises in the soil or lingering dirt clods.
Step 2: Building the Forms
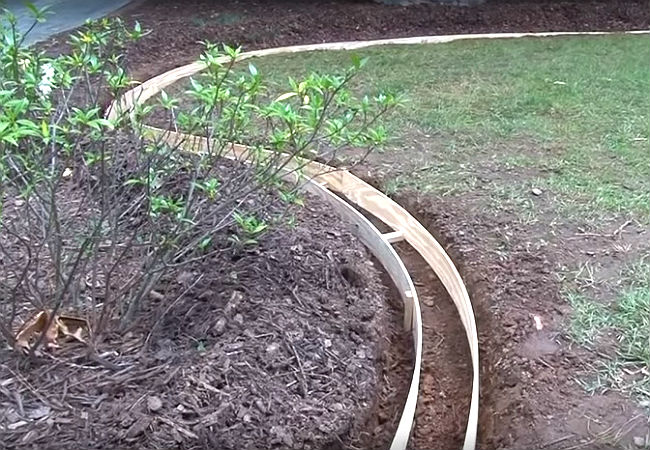
Create your forms from strips from ¼”-thick plywood.
Use a circular saw to cut 4-foot-by-8-foot plywood sheets lengthwise to create the sides of the concrete forms. Good for either curvy or straight designs, these bendable strips should be as wide your concrete edging’s desired depth (above and below ground) plus an extra inch for gravel in the trench.
Place your first plywood where you want to start your edging.
Position the plywood in the trench along the guide, and drive a 12”-long 1×2 stake on the outside of it. Remember: The form and stake should be no higher than the desired height of your border. Use a cordless drill/driver to insert two 1½-inch screws through the stake and into the plywood form.
At the opposite end, insert a 1×4 stake so that plywood strip overlaps only half of the wider stake. Attach the plywood to the stake using four screws this time (two rows spaced an inch apart). The extra set will ensure that the plywood form is securely attached—especially important if you’re forming the concrete edging in a curve.
Add additional support stakes every two to three feet between the end stakes.
Positioned inside or outside of the forms, extra stakes will help the plywood forms maintain the desired shape when the concrete is poured. If you add them on the inside, just be sure to drive them deeper into the ground so that only one inch is exposed. (Any more than that, and the concrete above it could be weak enough to crack.) Inside stakes don’t need to be screwed to the plywood forms.
Continue attaching plywood to fill out the rest of the form.
The next strip should butt tightly against the end of the first and be fastened with the same four-screw pattern. Continue adding more plywood forms, using the same method until you’ve finished one entire side of the forms.
Then, construct the other side.
As you build the second half, place a 1×2 wood spacer that’s cut to the desired width of your concrete edging crosswise between the stationed side and the new one—this will help you maintain consistent space between the forms. Push the second form snugly against the spacer before you drive a stake on its outside to hold it in place. You can use a single spacer and keep moving it to the next spot where you insert a stake. Once the form is fully built, fill in the bottom of the trench with an even 1-inch layer of Quikrete’s All-Purpose Gravel.
Step 3: Pouring the Border
Start with a durable concrete mix.
Quikrete’s Crack Resistant Concrete Mix is fortified with synthetic fibers so that it reaches 4000 lbs. per square inch (psi), which greatly reduces the risk of the border cracking.
Mix the concrete.
Whether you plan to mix your batch in a wheelbarrow with a shovel or in a small rotary concrete mixer, check out Quikrete’s videos for guidance first. Then, add water as needed to the dry concrete mix until all the dry ingredients are dampened. You want to be able to scoop up a handful and it will retain its shape—neither runny nor crumbly. An 80 lb. bag of concrete mix will require approximately three quarts of water to reach the correct consistency.
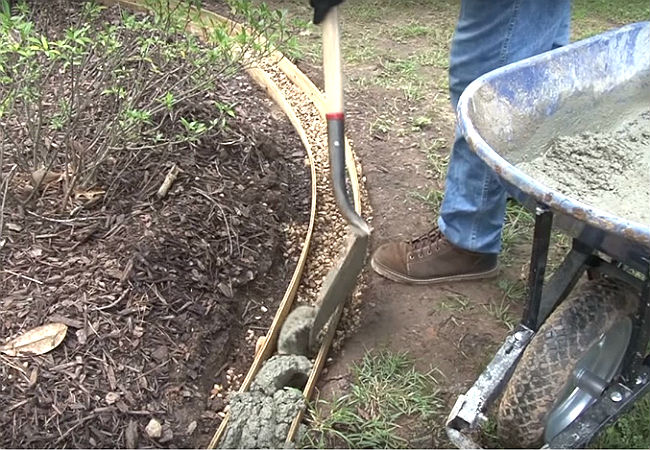
Fill the concrete forms with the wet concrete, leveling as you go.
Overfill the forms slightly with concrete, then use the shovel’s blade to “chop” vertically through the wet mix. This helps the concrete settle into the forms evenly and removes air bubbles. Pause every six to eight feet to slide a flat wood concrete hand float across the tops of the forms of the section you just filled. (Tip: If you find any low areas as you float the surface, just add a little more wet concrete and float it again.)
Get a beveled edge using a concrete edging tool.
This handheld tool features a mostly bottom with curved along one side. Place the flat edge of the tool on the top of the wet concrete facing in toward the center, with the curved part against the inside of the form. Then, slide the edging tool back and forth along the top of the wet concrete to form a smooth top and a beautifully rounded edge.
Before the mix sets, add control joints.
Stick a margin trowel’s blade straight up-and-down a third of the way into the concrete, and work it across the width of your concrete edging. Made every two to six feet, these cuts will help prevent large, jagged cracks where you least want them. Instead, if the concrete cracks, it will do so practically undetected at a joint.
Step 4: Finishing Up
Protect your concrete project.
Brush, roll, or spray Quikrete’s Acrylic Concrete Cure and Seal onto the fresh concrete edging as soon as it hardens to the touch. While this coating is not absolutely necessary for curing the border, it does save you from water-curing it—a process that involves spraying it six to eight times per day with a light mist over the next three to five days. Bonus: This application will help seal the concrete to protect it from grass stains after each mowing.
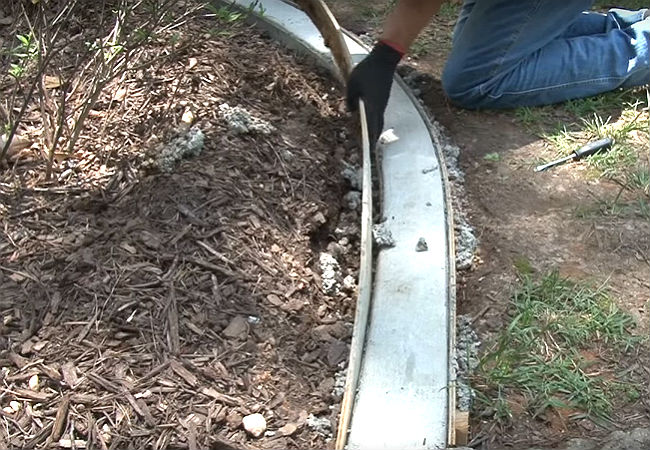
Unveil the fruits of your labor!
Remove the screws from the stakes and then strip away the forms. Backfill along the edges of the new border with soil or gravel to finish the landscape. Then, go ahead and take a lap around the neighborhood so that you can come back and admire your front yard’s new and improved design from the curb.
