We may earn revenue from the products available on this page and participate in affiliate programs. Learn More ›
A walkway or garden path enhances a home’s landscape and complements its exterior features. While traditional materials like brick and stone have always been prized for their appearance and durability, they can be quite pricey and are often difficult to install.
One easy and inexpensive alternative is to make a concrete walkway using a manufactured form. The result offers the economy of concrete without any sacrifices in looks or lasting power.
TOOLS AND MATERIALS
– Concrete mix
– QUIKRETE Walkmaker form
– Wheelbarrow or mixing box
– Plastic sheeting
– Excavation and site preparation tools
– Shovel
– Level
– Broom or stiff brush
– Margin trowel or finishing trowel
– Liquid cement color (optional)
– Polymer-modified jointing sand
How to Make a Concrete Walkway

STEP 1
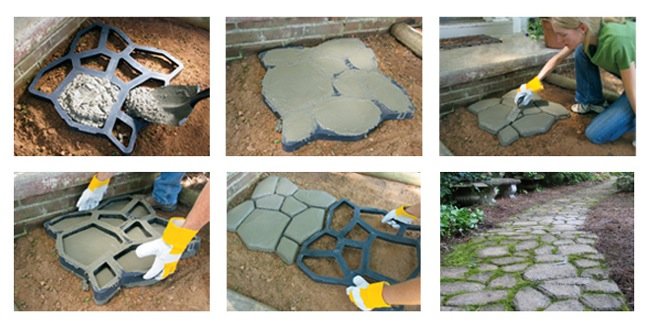
Prepare the project site by leveling the ground, removing sod or soil as needed. For a more durable base, excavate the area and add two to four inches of gravel (compact this layer so that it’s level and flat).
STEP 2
Following instructions on the package, mix a batch of concrete for the first section of your walkway. Place the QUIKRETE Walkmaker form at the start of your path, then shovel wet concrete into each of its cavities. Using a trowel, consolidate and smooth the concrete you’ve added up to this point.

STEP 3
Remove the form and trowel the edges to achieve your desired finish (it may help to wet the trowel in water). To ensure a non-slip surface once dry, broom or brush the section while it’s still wet. Now place the form over the next section of the walkway and repeat steps #2 and #3.
STEP 4
Along the way, rotate the form to vary the pattern if desired. Continue until your path is complete, then let the concrete cure for five to seven days.
Creating Curves

STEP 1
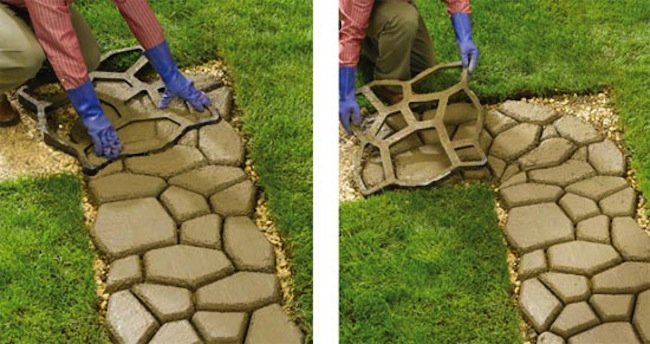
After removing the form from a newly placed section, reposition the form in the direction of the curve, pressing down to slice off the inside corner (photo left). Trowel the cut edge and the rest of the section to finish. Place the next section following the curve (photo right).
STEP 2
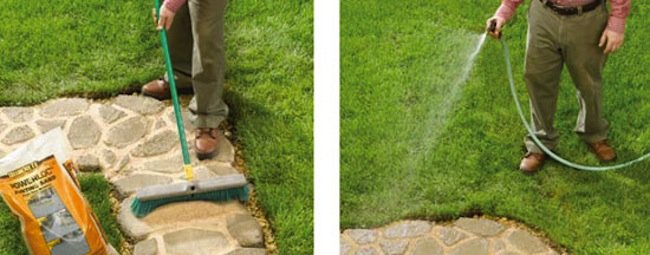
After the concrete has cured sufficiently, sprinkle the area around the joints with polymer-modified jointing sand, then sweep the sand into the gaps.

STEP 3
Mist the jointing sand with clean water. As you do so, take care not to wash the sand out of the joint. The polymers in the mixture will harden as the water dries, until by the end, the sand resembles (and feels a lot like) mortar.
Infusing Color
Color, which gives molded concrete a more natural-looking finish, is great for blending a walkway into the landscape. Adding colorant to the concrete mix is the easiest method, one that produces consistent results:
STEP 1
For every two 60- or 80-pound bags of dry concrete mix, blend one ten-ounce bottle of liquid cement color with five quarts of clean water. Mix the liquid into the dry concrete until the color is uniform. Add more clean water as needed to achieve the desired consistency.
STEP 2
After placing and finishing all path sections, cure the concrete carefully. If you anticipate that curing conditions are not likely to be ideal, it’s wise to apply concrete sealer.
Adding Decorative Effects

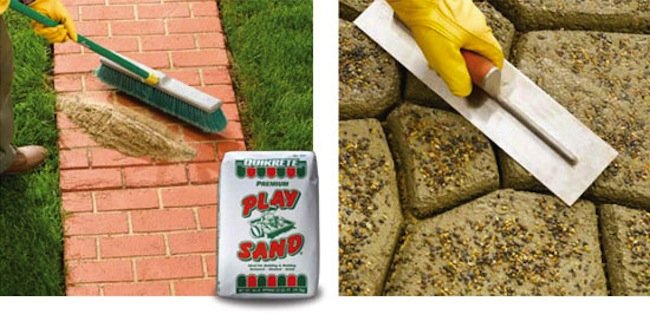
Use your broom or brush to fill walkway joints with sand or mortar mix for a look that mimics that of hand-laid stone or brick. In the latter case, mist the joints with water so that they harden in place.
Create custom surface finishes either by pressing small stones or pea gravel into the wet concrete or by brushing on a layer of sand. Apply such finish materials approximately one hour after placing the concrete, at which point it’s still damp but has not yet reached its initial set (making a thumb print should be hard).
For more on using the QUIKRETE Walkmaker to make a concrete walkway, visit QUIKRETE or view the video below:


