
We may earn revenue from the products available on this page and participate in affiliate programs. Learn More ›
We don’t give tub drains much thought until they give us trouble. Over time, tub drains clog and sometimes even corrode. After all, your bathtub is put to the test every day as you and the other members of your household bathe, depositing all sorts of body care products—and copious amounts of human hair—through the drain and into the pipes beyond.
The day may come when your drain ceases to function. If that happens, you’ll probably need to remove the drain for inspection, and then either carefully clean or completely replace it.
The drain removal process isn’t particularly difficult or time-consuming. It should take you anywhere from a few minutes to a couple of hours, depending on the type of drain you’re dealing with. As with all DIY projects, a few simple instructions will help the task go more smoothly.
While bathtub drains vary by type, they can be sorted into two broad categories: simple drains (including foot lock, roller ball, and lift-and-turn types) and drains with a trip lever (such as pop-up and plunger drains). Instructions for removing both types appear below.
Find your drain style and follow the step-by-step guide below to learn how to remove a bathtub drain stopper yourself.
Before You Begin
Before you get started with your bathtub drain removal task, be sure the water is completely turned off at the tub and drain or remove any standing water. In case the process requires you to get in the tub, thoroughly dry the tub surface so you won’t slip. Assess the condition of the tub drain. Excessive amounts of rust, mildew, or decay may indicate a larger problem, in which case professional assistance may be needed. Read these steps carefully, and if you have any doubt about your ability to accomplish this task, call a plumber.
How to Remove a Simple Tub Drain

If you have a simple tub drain, which includes foot lock, roller ball, and lift-and-turn drain-stopper types, follow these steps. Simple tub drains are opened and closed via various methods at the drain itself, as opposed to lever drain types, which have a control that’s inserted in the wall of the tub, above the drain.
SUPPLIES
– Wrench
– Vinegar
– Drain key or smart dumbbell (if you’re moving the entire drain, including the flange)
– New drain stopper if you plan to replace the old one
STEP 1: Remove the tub stopper.
If the drain is in good shape, pull on a pair of rubber gloves and continue your mission to remove the tub drain plug.
- For a foot lock or roller ball plug, simply rotate it counterclockwise until it separates completely from the drain shaft.
- In the case of a lift-and-turn drain, lift the plug and free it by loosening the set screw underneath. If you find that the set screw on your lift-and-turn drain is stuck, a series of light-to-medium taps may help to loosen it. Use your wrench or screwdriver to nudge it into motion if necessary, but be careful not to use too much force, which could damage the drain.
STEP 2: Clean the drain basket and stopper.
An important part of learning how to remove a tub stopper is also understanding the need to clean all the parts thoroughly. Once the drain basket is fully exposed, use a mild cleanser or a mixture of one part vinegar and one part baking soda and a soft cloth to wash it off. Also clean the plug or stopper if you’re planning to reinsert it rather than replace it.
STEP 3: Use a bathtub drain cleaner to clear any clogs.
Now, fill the tub with an inch or so of water and watch it drain. If the water still drains too slowly, move on to a stronger drain cleaner (one that specifies that it’s suitable for tubs) or turn to a tried-and-true DIY drain cleaner that uses materials you already have on hand. Fill the tub again with about an inch of water, and watch it drain. Repeat as necessary until the tub empties at a reasonable rate, then proceed to reinstall or replace the part(s) you’ve removed.
STEP 4: Remove tub drain basket.
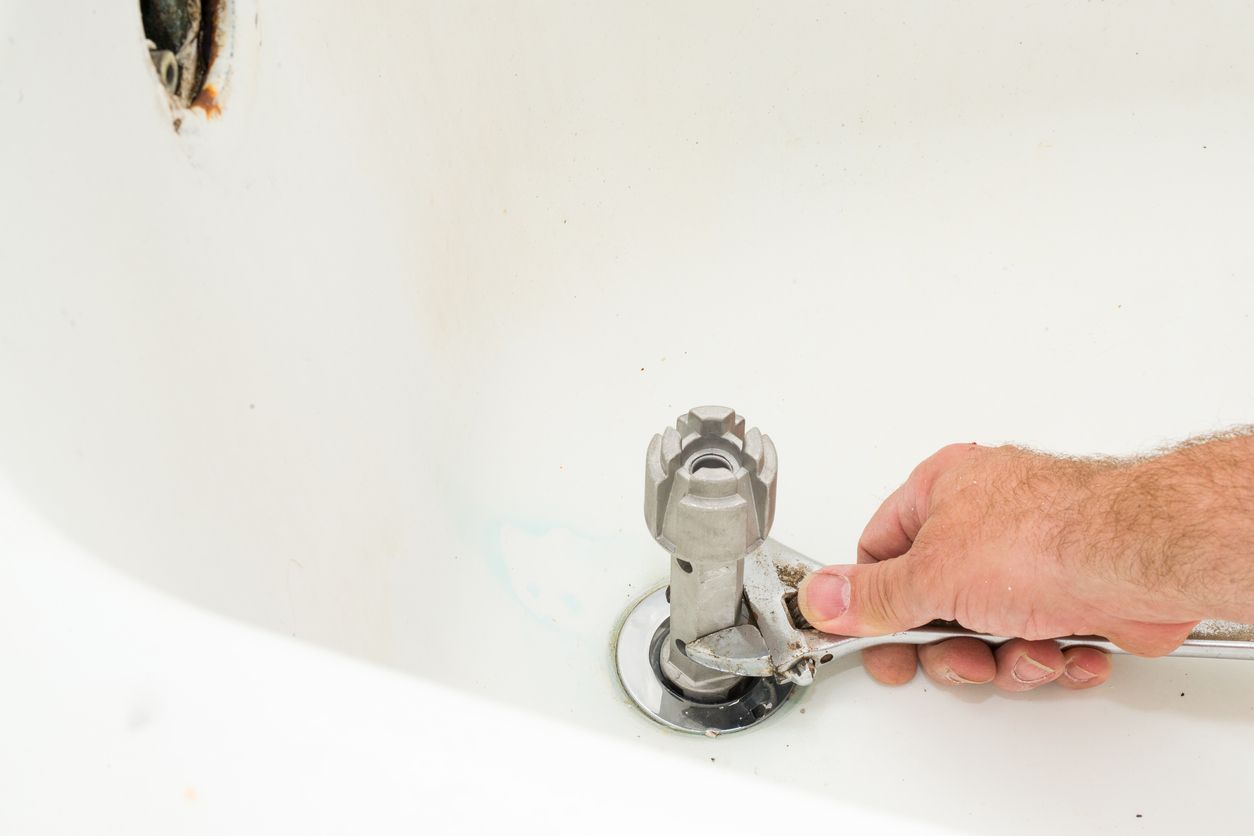
If you’re removing the entire drain apparatus, including the basket (also known as the flange), insert your drain key or smart dumbbell into the opening. Turn it counterclockwise and continue turning until the drain flange is released, then remove the flange while it’s still attached to the drain key.
Tip: If the flange is stuck, use a hair dryer to heat up and loosen the putty, then try again.
STEP 5: Clean the opening and all pieces thoroughly, then replace them.
Once the drain flange has been removed, be sure to clear out any old putty residue from the base of the opening before replacing the flange or installing a new one.
STEP 6: Test the drain for leaks.
Let the putty dry for the time period specified by the manufacturer, and then close the drain and partially fill the tub with water. Mark the water level with a piece of tape or a pencil mark and let it sit for about an hour. If after that time the water level has dropped, check that your drain is installed and sealed properly.
How to Remove a Tub Drain With a Trip Lever

Trip-lever drain stoppers are operated by a lever inserted into the side of the bathtub. Known as pop-up and plunger drains, these are a bit more complicated to remove and replace.
SUPPLIES
– Wrench
– Drain key or smart dumbbell (if you’re moving the entire drain, including the flange)
– Vinegar and baking soda, or mild cleanser (optional)
– New drain stopper if you plan to replace the old one
– Commercial drain cleaner (optional)
STEP 1: Remove the tub drain plug.
Before you begin, check the drain for excessive rust, mildew, or decay, which may indicate a larger problem that may require professional help. If the drain looks to be in good shape, proceed to the next step.
- If your drain has a visible stopper, set the lever to the open position and use a screwdriver to remove the trip lever faceplate as well as the lever and linkage.
- If your drain has a trip lever without a visible stopper, use a screwdriver to remove the screws on the trip lever faceplate and move it away from the tub wall; the attached plunger should come out with it.
STEP 2: Clean the disassembled drain pieces.
Once the drain has been disassembled, use a mild cleanser or a mixture of one part vinegar and one part baking soda to wash it off. Also clean the plug or stopper if you’re planning to reinsert it rather than replace it.
STEP 3: Test the drainage speed and clear clogs as necessary.
Now, fill the tub with approximately 1 inch of water and watch it drain. If the tub still drains slowly, try your luck with a stronger, tub-specific commercial drain cleaner or a homemade cleaner and repeat the drain test.
STEP 4: Replace bathtub drain pieces.
When the tub again drains properly, reinstall the cleaned drain parts or replace them with new ones.
STEP 5: Remove, deep clean, and reinstall the entire drain apparatus (optional).
If you choose to remove the entire drain apparatus, including the flange, use a drain key or smart dumbbell as described in Steps 3 and 4 in the “How to Remove a Simple Tub Drain“ section above.
STEP 6: Test the drain for leaks.
For this type of drain, you’ll also want to test for leaks, per the steps indicated above. Plug the drain, fill the tub with water, mark the water line, and check it an hour later.
Final Thoughts
Whether you’re removing and replacing your tub drain for aesthetic or practical purposes, you’ll find this task is fairly easy to do if you follow the steps outlined above. When tackling any task that has to do with plumbing, it’s always a good rule of thumb to proceed with an abundance of caution and remember that if complications arise, a professional plumber is just a phone call away.
Nevertheless, assembling the proper supplies and following the steps carefully and in order will almost certainly lead to a successful tub drain removal, and another notch in your DIY tool belt.
FAQs About How to Remove a Bathtub Drain

If you have a few last questions you’d like answered before you don your gloves, read on to learn more about how to remove a bathtub drain plug. There’s no such thing as too much knowledge, after all, and you might as well get all the info you can about removing a bathtub drain.
Modern tub drains are indeed universal. Any bathtub drain can fit any standard modern bathtub, which has drain holes of 1.5 inches in diameter. Antique tubs, however, may have differently sized drain holes, so you’ll want to double-check those.
The parts to replace a tub drain cost around $100. If you’re doing the work yourself you’ll save on plumber’s fees, which can be a few hundred dollars.
Fortunately, you needn’t access the tub drain pipe in order to remove a tub drain, because it’s a much bigger job involving removing the tub or accessing the drain pipe from underneath.
Time and use, and the resulting gunk, may have made your bathtub drain a bit stuck. Lightly tap the drain or use a wrench or screwdriver to loosen it. You might want to use a thin cloth to protect the drain from scratches as you work on it.
If the crosshairs are gone or broken, you may have to use a drain key, wrenches, and lubricant to remove the tub train.
