
We may earn revenue from the products available on this page and participate in affiliate programs. Learn More ›
Insulating a basement is a key step in finishing the home and helps to ensure that the heat generated by the furnace remains inside during the winter. The insulating layers also work to keep heat out during the summer months so your home stays nice and cool. As well, maintaining a consistent temperature in the basement helps reduce the risk of condensation so you won’t need to worry about water clinging to pipes, vents, and other metal surfaces.
However, before you attempt to install insulation for basement walls, you’ll want to understand the process for this home upgrade. If the insulation project isn’t done correctly, you may not see the benefits offered by the insulating layers. Use this guide to find out how insulating basement walls can benefit your home.
The Benefits of Insulating a Basement
The many benefits of installing basement insulation can help you decide whether this renovation project is worth the time and investment. John Parks, co-owner and COO of Advanced Insulation System in San Diego, California, says, “Insulating basement walls is definitely worth it, especially if the space is being used as a living area or for storing temperature-sensitive items.” Benefits include improved energy efficiency, enhanced moisture control, noise reduction, increased wall durability, and the potential for additional livable space, such as a basement apartment or home office.
- Energy efficiency is the most obvious benefit of insulating and finishing basement walls. The added layers of insulation reduce the transfer of heat through the walls, ensuring that the home retains its heat in the winter and that heat from outside does not enter during the summer.
- Moisture control is another great benefit of an insulated basement. By installing insulation you can better maintain a consistent temperature inside the home and prevent moisture from entering or escaping. Installers can also waterproof the basement walls at the same time for added moisture control and protection.
- Noise reduction may not be your intended goal, but layers of blown or sprayed foam insulation will dampen any sounds that cross through the medium. This improved noise reduction helps to create a comfortable space for a home office, bedroom, or basement apartment.
- Increased wall durability is a possible benefit, depending on the type of insulation you use for this renovation project. Insulation reduces the risk of moisture buildup by preventing extreme temperature fluctuations that may otherwise cause materials to expand and contract, leading to cracks and deterioration.
- Additional livable space is one of the best reasons to look into how to insulate a basement. DIYers can create a home office, kids’ playroom, spare bedroom, second kitchen, or even a full basement apartment, though if you are tackling the entire basement, you may want to track down the best insulation contractors to help manage the project.
How to Prepare a Basement for Insulation
Step 1: Resolve moisture issues.
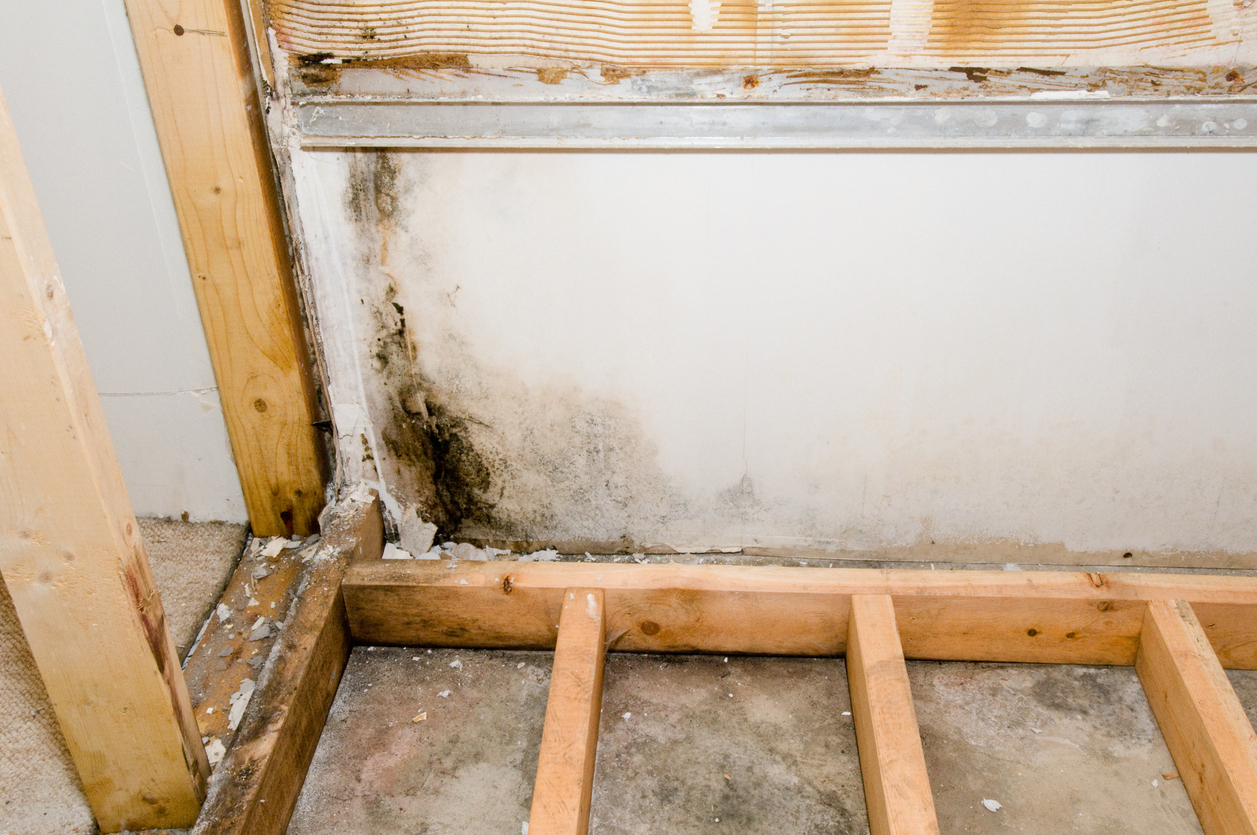
Moisture in the basement is a major problem that needs to be handled before installing any type of insulation. Otherwise, moisture can seep into the basement wall materials, causing irreparable damage. For this reason, conduct a basic dampness test by taping a small piece of plastic sheeting to a bare concrete wall and leaving the plastic patch in place for about 48 hours. After this period, check the interior and exterior of the plastic sheet for condensation to determine if water is seeping through the basement walls.
If you find that water is leaking into the basement, you will need to conduct a more thorough investigation to determine the cause. In many cases, the issue is that the gutter system is draining too close to the home’s foundation. Other reasons could include cracks in the foundation; gaps around pipes, conduits, or vents; or flooding in the area. Assess the situation, take proper steps to rectify the issue, and then make sure everything is dry before installing any basement wall insulation.
Step 2: Determine the best type of insulation for your basement.
There are several types of insulation materials to choose from when insulating basement walls.
- Fiberglass insulation is common for other projects, but fiberglass is not the best type of insulation for basement walls because it tends to hold onto moisture, leading to potential mold, mildew, rot, and water damage. However, if you do choose to use fiberglass insulation, then it’s best to go with faced, as opposed to unfaced, insulation because faced insulation incorporates a vapor barrier to help manage moisture issues.
- Sheep’s wool insulation naturally wicks moisture away and has a higher energy efficiency than fiberglass insulation. However, if sheep’s wool insulation is not installed properly, it can bunch up at the bottom of the wall, leaving the top of the wall uninsulated.
- Spray foam insulation can be an effective option for basements, especially for filling narrow crevices, gaps, and cavities like those around light switches. It doesn’t retain moisture and has good sound absorption properties, but spray foam tends to be more costly than other insulation options, so it’s worth shopping around to find the best spray foam insulation contractors at a reasonable price.
- Rigid foam board insulation is often the best way to insulate basement walls in terms of moisture resistance, cost, quality, and ease of installation. It comes in sheets that are easy to measure, cut, and install. The material is also water-resistant, so it’s less likely to retain moisture. However, rigid foam boards are a difficult option for narrow openings. Consider pairing a small amount of spray foam with foam board insulation for a combined approach.
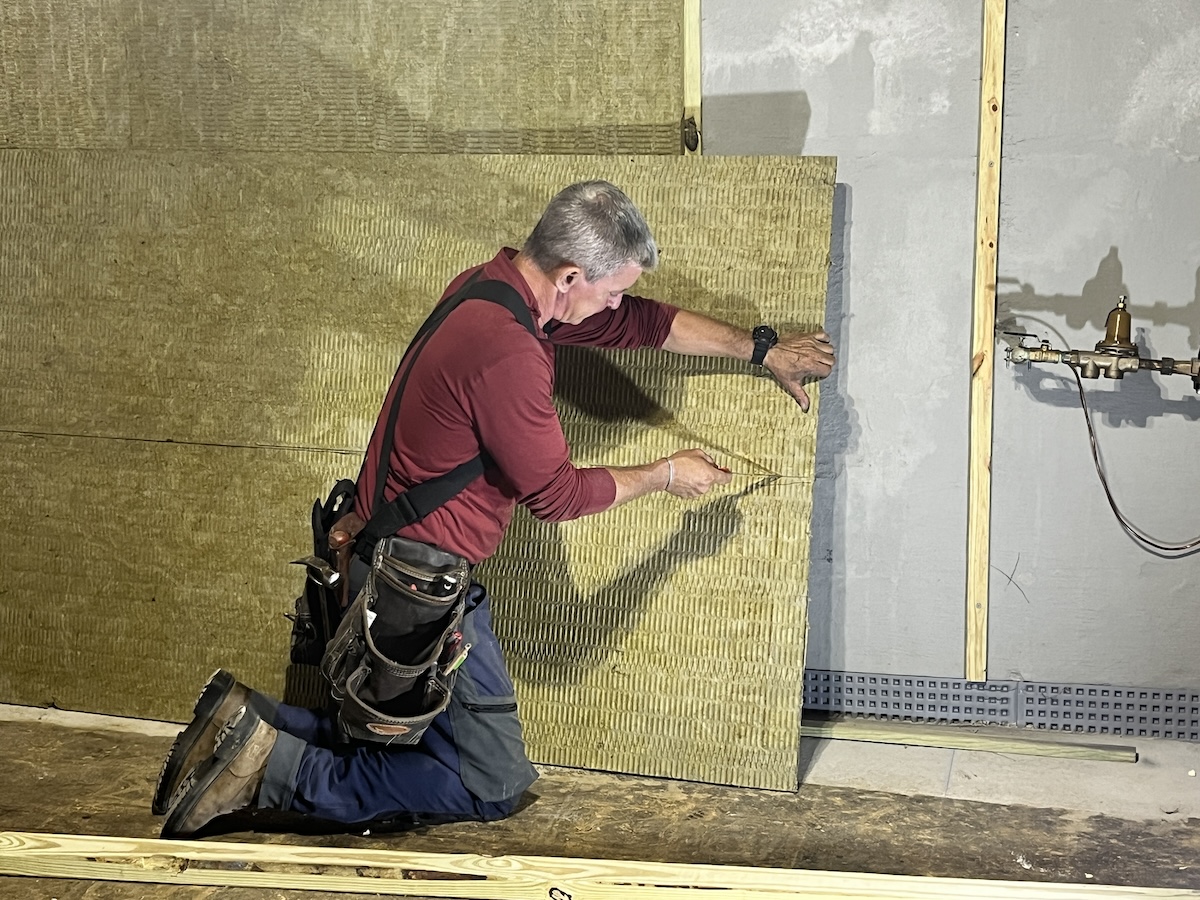
- Mineral wool board insulation is another rigid board insulation. It’s resistant to high temperatures, fire resistant, and resistant to mildew and rot.
Step 3: Seal cracks and repair any damage to the walls.
Before adding layers of insulation to the basement walls, it’s necessary to seal any cracks and patch chips or other damage to help prevent future problems. As Parks advises, “Before adding insulation, it’s crucial to seal any cracks in the foundation and apply a waterproof coating to prevent water intrusion.” DIYers can typically handle small foundation cracks and chips, but if there is extensive damage, it’s a good idea to hire a foundation expert to repair the basement foundation before proceeding with the basement insulation project.
How to Insulate a Basement Using Rigid Boards and Furring Strips
SUPPLIES
Rigid foam board insulation
Foam-compatible adhesive
Furring strips
Concrete screws
Sealing tape
Caulk
Drywall
Drywall screws
Step 1: Secure the insulation to the concrete.
Start by securing the insulation to the concrete wall. If you’re wondering how to stick insulation to walls in basement concrete, the best method is using a foam-compatible adhesive.
Step 2: Mount the furring strips.
Furring strips are thin pieces of wood used to mount insulation or drywall to walls. Familiarizing yourself with these materials will help you learn how to insulate basement walls.
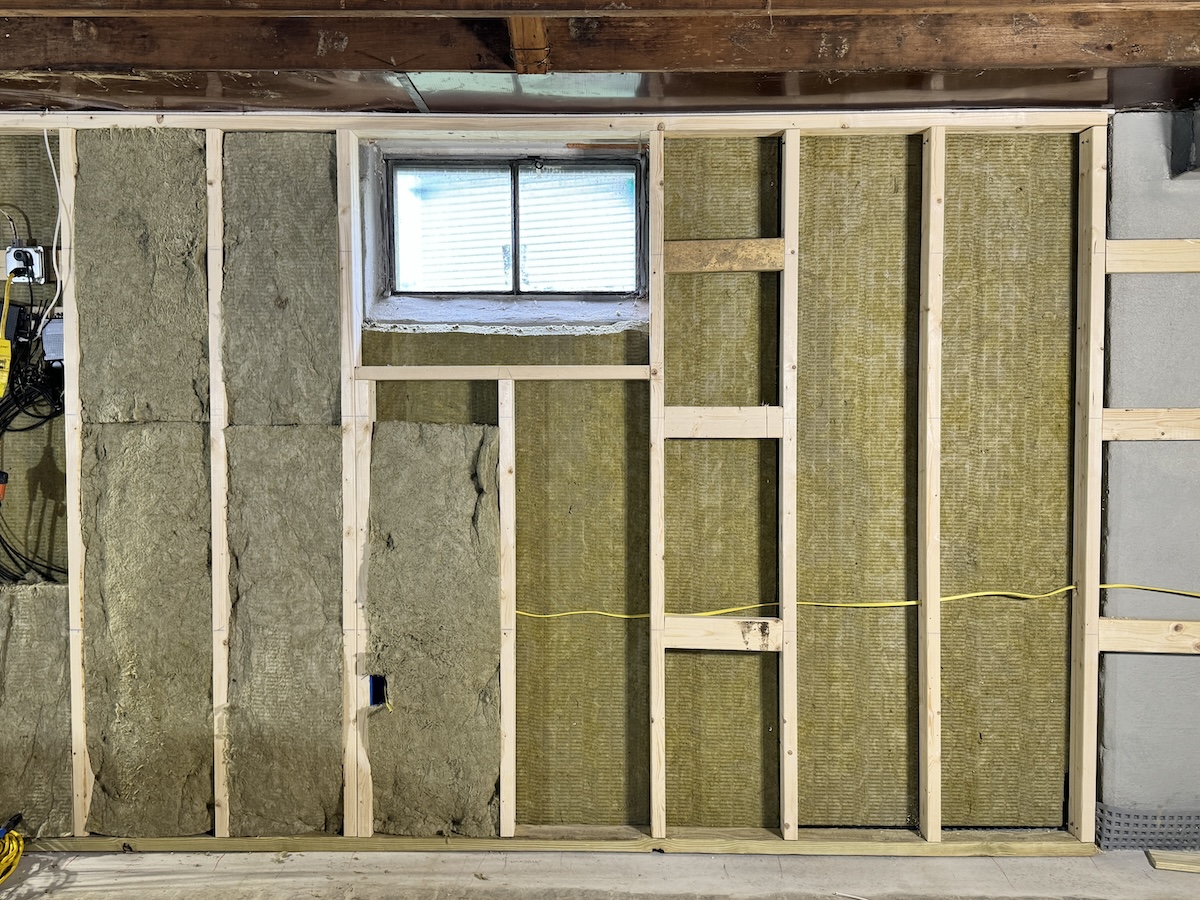
When working with foam board insulation that has a built-in pocket to accept a 2-inch by 3-inch furring strip, you can use this pocket to mount the furring strips directly to the concrete with concrete screws, masonry nails, or spring spikes. However, this will not leave any space for running electrical wires through the walls.
If you need space for electrical service, build up the furring strips in a grid on the walls. Start with horizontal strips, then lay out vertical furring strips on top of the horizontal strips to create a gap for the wiring. Position furring strips over the insulation and secure them to the concrete.
Step 3: Seal all gaps, cracks, or holes in the insulation.
Small cracks, gaps, or holes in the insulation can create cold spots along the basement wall. When these cold spots come in contact with warm air, condensation can form. While a little condensation once or twice isn’t a huge problem, ongoing or severe cases of condensation can lead to mold growth, rot, and water damage.
Sealing and insulating the basement walls helps to reduce humidity and thermal loss while preventing moisture from seeping into the home. To avoid condensation formation in the basement, it’s recommended to use sealing tape, caulk, or spray foam insulation to fill any crevices, gaps, seams, or narrow openings that are too small for rigid foam board insulation.
Step 4: Install a thermal barrier.
Most building codes require a thermal barrier that separates the insulation from the interior of the building. Even if this isn’t a requirement in your area, a thermal barrier is a good idea. A thermal barrier is typically ½-inch or greater panels of gypsum wallboard, drywall, or some type of equivalent.
Some installations also require a vapor barrier: “If you’re working with rigid foam or closed-cell spray foam, you won’t need an additional vapor barrier because these materials already resist moisture,” Parks notes. “However, if you’re using fiberglass or mineral wool, it’s important to install a vapor barrier on the warm side of the insulation, usually polyethylene sheeting.”
How to Insulate a Basement Using Rigid Boards and 2x4s
SUPPLIES
2×4 framing boards
Rigid foam board insulation
Foam-compatible adhesive
Furring strips
Concrete screws
Sealing tape
Caulk
Drywall
Drywall screws
Step 1: Attach the insulation to the concrete walls.
Using 2×4 framing is the more common method of installing insulation and finishing basement walls. This method leaves space for electrical and plumbing connections and creates a moisture-free space where extra insulation can be added to increase the walls’ R-value.
Start this process by attaching the insulation to the concrete. This can be accomplished relatively easily by applying a foam-compatible adhesive to the wall and then mounting the rigid foam board insulation to the concrete wall.
Step 2: Measure and cut 2×4 lumber for the frame.
You will need to measure and cut a piece of pressure-treated lumber to serve as the bottom plate of the frame. Fasten the bottom plate to the concrete with concrete screws, masonry nails, or spring spikes. Next, measure and cut the vertical pieces of the frame and mount the vertical pieces to the bottom plate, ensuring that the insulation sits flat against the wall. Finally, add the top plate and secure it to the ceiling joists.
Step 3: Seal all gaps, cracks, or holes in the insulation.
Any small gaps or cracks in the insulation need to be sealed up to avoid creating cold spots along the basement wall. If these gaps or holes are not sealed, the warm indoor air can cause condensation to form when it comes in contact with a cold spot.
Consistent condensation problems can lead to mold growth, rot, and water damage, forcing you to make costly repairs. To avoid this problem, it’s a good idea to use sealing tape, caulk, or even spray foam insulation to make sure that any gaps, crevices, holes, seams, or cracks are filled and sealed off.
Step 4: Install a thermal barrier.
Finish the wall by measuring, cutting, and mounting drywall to the frame. This layer of drywall acts as a thermal barrier that separates the insulation from the interior of the building. Thermal barriers are required by most building codes, but even if this isn’t a requirement in your area, a thermal barrier is a good idea. You can use ½-inch or greater gypsum wallboard panels, drywall, or an equivalent material for the thermal barrier.
Some installations also require a vapor barrier: “Whether you need a vapor barrier depends on the insulation you’re using,” says Parks. Generally, a vapor barrier won’t be required for rigid foam or closed-cell spray foam insulation, but if you are using fiberglass or mineral wool, then a vapor barrier is highly recommended to help control moisture problems.
When to Hire a Professional for Basement Insulation
While it’s possible for a DIYer to insulate a basement without professional help, there are some scenarios when it’s best to bring in the pros. For instance, if you are using spray foam insulation instead of rigid foam boards, then it may be better to hire a professional who already has the right equipment, training, and experience to know how to insulate the basement properly.
Additionally, if there is significant damage to the foundation or problems with the basement, then involving a professional can help identify and repair these issues.
“DIYers should consider hiring a professional if they’re dealing with moisture issues, such as leaks, water damage, or mold. These problems need to be resolved before insulation is installed,” adds Parks.
