We may earn revenue from the products available on this page and participate in affiliate programs. Learn More ›
The use of fresh herbs can mean the difference between decent food and truly vibrant, delicious cuisine. But purchasing such greenery at the market can get pricey, especially if you only need a sprig or two. Plus, it’s a lot more convenient to have the likes of fresh basil, parsley, sage, and so much more immediately at your disposal, whenever you get the urge to whip something up.
If you appreciate having an abundance of flavor on hand at all times—and saving money in the long run—keep reading. This guide will help you grow successful kitchen herb gardens that brim with strong, healthy plants. Take your culinary accomplishments to the next level, and your family and friends will thank you!
1. Select a sunny spot.
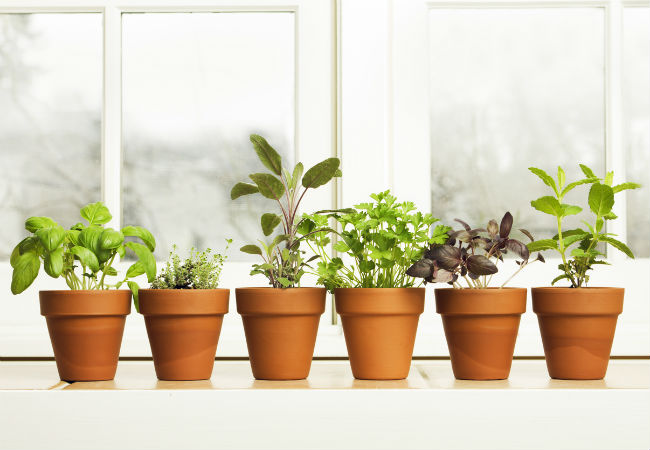
Herbs love the sun; they tend to grow tall and straggly without it, producing limp stems instead of healthy compact buds. To successfully grow herbs indoors, choose a windowsill that receives a minimum of four hours of direct sunlight per day. For even growth, turn your herb pots around every day or two to ensure that all sides receive an equal amount of direct sunlight.
2. Supplement light if natural light isn’t available.
Supplemental lighting can let you nurture a kitchen herb garden even if you don’t have an adequately sunny spot. Grow light kits are available from garden centers or online retailers for between $100 to $200, depending on size. And if you’re DIY-handy, you can fashion supplemental lighting using dimensional lumber to construct a frame and standard fluorescent bulbs and fixtures. Whatever you rig up, remember: You’ll need to position your plants within a few inches of the fluorescent bulbs for the best results.
3. Provide good drainage.
While cute containers add a touch of style to a kitchen’s décor, herbs—like all potted plants—need good drainage. The pots you choose should have drain holes in the bottoms. You may see photos of herbs tucked into pretty little cups and glasses, but without drain holes, the plants are at risk of developing fungal diseases that could kill them.
4. Grow herbs you love!
The best herbs for you are the ones you’ll actually use—especially considering how you’ll need to harvest the herbs frequently anyway for the health of the plants (see Tip #10). If you enjoy Italian or Mediterranean fare, start with basil, oregano, parsley, and mint in your kitchen herb garden. Other easy-to-grow herbs that home chefs frequently reach for include chives, thyme, cilantro, and rosemary.
RELATED: The Best Herbs to Grow Indoors
5. Downsize with dwarf varieties.
Think small when choosing herbs for kitchen gardens, where space is often limited. Dwarf varieties allow you to have all the herbs you want without taking up much room. Spicy Globe Dwarf Basil, for instance, reaches a mature height of about eight inches, making it a better choice for a small kitchen than Purple Ruffles Basil, which can grow up to three times that size and top out at two feet high.
These petite plants also make it easier to invoke another space-saving principle: the use of vertical space. Consider stacking your short potted plants vertically—on shelves, tiers, or wall hooks—up along a well-lit backsplash or wall in the kitchen.
6. Use the right growing medium.
Indoor herbs have a better shot at healthy growth if you plant them in a sterile growing medium. Choose a “potting mix” or “growing mix” that has the word “sterile” on the label. Rather than soil, this type of growing medium contains a germ-free mixture of lightweight ingredients, such as peat moss, vermiculite, and shredded pine bark, which resist compaction so roots can develop easily. Avoid using soil from your garden that can become dense and compact, and also contains bacteria and/or tiny insects that could kill your kitchen herbs.
RELATED: 20 Tips for Keeping All Critters Out of Your Yard and Garden
7. Start seeds for added value.
If you purchase young plants from a garden center, you’ll be harvesting in no time—but once those plants “go to seed” they’ll quit producing herbs. So for kitchen herb gardens that last, buy seed packets, from which you can grow multiple plants—and save money in the process. A single young plant runs $3 to $6 while a packet of seeds can provide you with 20 plants, or more, over time, for less than $5 per packet. Most herbs will be ready to harvest in two to three months from the time the seeds sprout.
8. Keep medium moist until sprouts appear.
Most herb seeds are quick to germinate but they require a consistent level of moisture until they sprout. Fill your pot with damp, not sopping, growing medium and level the top. Place two to five seeds on top of the medium, and then lightly sprinkle dry medium on top—just a dusting will do. Cover the entire pot with plastic wrap and put it in a dark location until the seeds sprout. Then, remove the plastic and set the pot on the windowsill.
The exception to this rule is for seeds that require light to germinate, such as oregano. If sowing such seeds (read the packet for germination information), forego the dusting of growing medium on top—just cover the pot with plastic and place where the seeds will receive light, but not direct sun.
9. Start new seeds every couple of months.
The average herb plant will reach maturity and go to seed in about four months, after which it will no longer produce fresh herbs. By starting new seeds every two months, the new plants will be producing vigorous growth by the time the existing ones are declining, and you’ll always have a fresh supply of herbs at hand.
10. Harvest often but judiciously.
Harvesting leaves from the tops of herb stems will encourage the plant to grow more quickly. Just be sure to snip carefully. Remove no more than 1/3 of a stem when you’re ready to add the herb to your food. Snipping off more can shock the plant and cause it to stop growing.
11. Go easy on the fertilizer.
You can feed your kitchen herbs with an all-purpose vegetable fertilizer every two or three months, but dilute the solution to one-third the recommended strength. Indoor herbs do well with a small amount of fertilizer, while too much can cause rapid growth that reduces the flavor of the herbs.
12. Water weekly.
Watering kitchen herbs once a week is usually sufficient. Most herbs prefer slightly damp, but not soggy, conditions. Give plants enough water so that a little excess runs into the drainage saucer below. An hour after watering, dump out the saucer to ensure that the roots aren’t sitting in water. If the growing medium dries out very quickly, which can happen if the herb is growing rapidly and its roots are absorbing more moisture than normal, water every three to five days. A good way to check if herbs need water is to poke the tip of a finger about ½-inch below the surface of the growing medium. If your finger comes out bone dry, water away!
13. Save a favorite outdoor herb.
If you grew a much-loved herb outside over the summer, propagate a new plant for your kitchen garden from a cutting. Snip off four to five inches of stem from a healthy outdoor plant. Remove all leaves but the top two or three, and then dip the cut end of the stem in root stimulator (available at garden centers). Push two-thirds of the stem into a moist growing medium and place the entire pot in a clear plastic bag to retain moisture. When you see new growth (in about six weeks), take the pot out of the bag and place your new herb plant on the windowsill.
14. Avoid frostbit foliage.
Since most kitchen herb gardens are located on windowsills to get the best light, there’s a good chance the leaves will press against the window glass. In good weather, or if the window has insulated glass, this isn’t a problem. But, if winter temps dip below freezing, single-pane window glass can become frosty and damage the leaves that are touching it. In extreme cases, frostbit leaves can cause the entire plant to die. If your windowsill is too narrow to prevent the leaves from touching the glass, place a small table in front of the window for the kitchen herb garden.
RELATED: How to Help Your Houseplants Survive the Winter
15. Mist herbs when indoor air is dry.
Outdoors, herbs receive the rain and natural humidity they can’t get in a dry, temperature-controlled home. Heated winter air is often especially arid, so mist or spray foliage lightly with water once every two or three days and they’ll reward you with healthy growth.


