Hi, I'm Bob Vila.
Welcome to the show.
We're remodeling a little 85 year old house here, and we've been working in the basement, creating a family room today.
We're putting in a half bathroom with a very unusual toilet and a laundry room in that area.
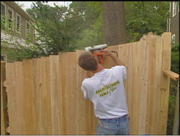
On the outside of the house, we're building a white cedar fence that incorporates some very unusual storage features.
And we're cutting down a door to install in the new basement entry.
Stick around, it's good to have you with us.
Alright, the major landscape improvement that we're doing to the side and the back of the house involves fencing, and Jay Tarantifino is with us from Architectural Fence.
This is all white heater they use, right?
Yes, sir.
So, why is that the best choice for this kind of fencing?
It's a wood that's a northern species, it's local and it's impervious to rot.
Yeah, it's long lasting.
It's long lasting, yes.
Yeah.
And now one thing that I want to ask is, I've always thought that mixing concrete in a hole and putting it in a hole surrounding a wood post of any sort is a bad idea.
Doesn't it promote rot?
It does, if it's done improperly.
There is a correct way of doing it.
What we do is, we set a post to approximately a 36 inch depth.
We'll through approximately 6 inches of material dirt back on the hole.
Of dirt.
And then we'll add the concrete.
That way it doesn't create a total seal.
It allows the water to pass through the wood, between the wood and the concrete.
And the concrete is there for stiffness.
Stiffness, stability and it remains the elevation of the post.
So the key, is not to totally encase that post in concrete.
Correct.
Because if you That you would be trapping moisture in the wood.
Yes, sir.
And that accelerates the rotting process?
Yes.
I gotcha.
All right.
Well, what are we creating right here?
This almost looks like shower stalls at the beach club here.
Yeah, it is in a sense.
Yeah, basically Sarah came to us and...
Our homeowner.
Yeah, homeowner.
She's said that very tight sight and she wished could have a shed, a planting area and a trash bin.
So I says oh, we can give that to you.
We have a spot on the side and this is basically what this creates.
So essentially, you got the fence going along the property line and you're putting up these little wing walls.
These are wing walls, yeah.
They're wing fences, and we'll have an enclosure for trash.
Let's talk about what you've already done though, because when you got here you had to deal with kind of a rough site.
What's the first thing you had to work on?
When we came here, first Bob, we had, there was an existing chain link fence that was up in the back line with some heavy growth.
So we had to come in, cut the growth and also remove the chain-link fence.
What about the digging on the site?
Is it very rocky?
Isn't there some ledge around here?
There's quite a bit of rock here, as a matter of fact.
We've struck quite a bit of rock in the holes as we're digging.
Loose material and also some solid material.
These posts have to be dug to a 36-inch depth, so we find it quite frequently.
That's why the cement also helps.
Is the depth because of the frost heaves that we encounter in cold climates?
It's for the frost as well as stability of the fence.
A six foot high fence needs a certain amount in the ground.
It's generally, two-thirds of the height must be set in the ground.
Two-thirds above and one-third below?
Correct.
Gotcha.
OK, and what about the actual panels?
These were made back in your shop and then you install them on-site?
Yes sir.
You've got a sloped site.
How do you deal with that?
Well that's an interesting question.
We have to do what they call racking receptions , which basically takes a section that's built square Yeah.
And actually slopes the boards to make up for the difference in the elevation and the height of the ground.
OK.
And you can do that even though you've got double nailing on all of these boards and so forth?
Yeah, they go to a certain extent.
Sometimes they reach a point where they won't rack any further, and in that case we have to build the panels on site.
Okay.
Which you've seen here.
What about the caps?
The caps.
The fence caps on the top of the fence is a finish piece as well as it helps with the rain .
Basically we have to sometimes, when you get into a position where the board's on a extremely racked situation your boards stagger.
Yeah.
So you have to cut the top of the boards in order for this cap to fit over, because there is only about a half inch that fits on the top of the board.
Now putting up fencing on a slope side has got to be the hardest job.
Yeah, it's not easy.
Yeah.
Alright, so most fencing has a Well they're both nice size but one side is clear like this and other side has the rails exposed and so how do you choose which side faces in what direction?
That's up to the home owner.
There's really, unless there's some town ordinances that specify who gets which side basically this is what we call the good side.
The beauty side.
The beauty side.
And then the back side of course has the three horizontal rails.
And what have you done here?
We've done it both ways here Bob, as a matter of fact.
The rear fence actually, we turned the good side in to the homeowner.
Okay.
And then the side line, we turn the rails inside the homeowner.
So, we've given the beauty side to the neighbor.
Correct.
And the neighbor's very close to the fence.
Yes, it's a beautiful fence.

